Jupyter MCP Server is an extension for Jupyter environments that integrates LLMs with real-time coding periods. By implementing the Mannequin Context Protocol (MCP), it permits AI fashions to work together with Jupyter’s kernel, file system, and terminal in a safe and context-aware method. On this weblog, we’ll discover learn how to use Jupyter MCP Server in your system.
What are MCP Servers and why do we want MCP Servers?
MCP (Mannequin Context Protocol) Servers are devoted go-between that facilitate communication between AI assistants and purposes or environments exterior of them. They permit AI fashions to run in a state-aware method, providing them real-time context comparable to variable values, code historical past, datasets, and outcomes of execution.
With out MCP servers, AI fashions function in a vacuum with no data of pre-set variables. This isolation constrains their capacity and potential for making errors. MCP servers handle this situation by offering AI with the ability to cause, carry out, and enhance in a real-time surroundings, enabling them to turn into extra practical, exact, and efficient.
What’s Jupyter MCP Server?

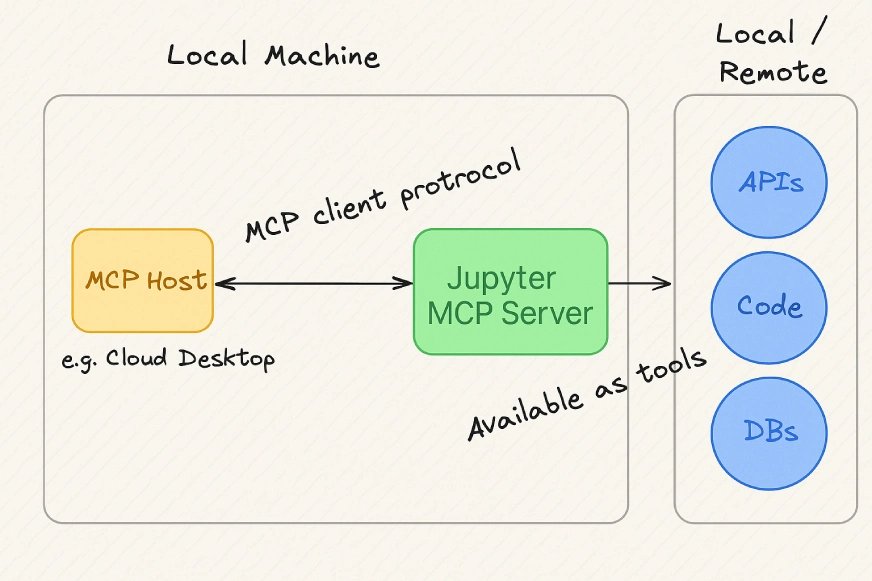
Jupyter MCP Server is a device that acts as a bridge between a giant language mannequin and the consumer’s reside Jupyter surroundings. By primarily utilizing the Mannequin Context Protocol (MCP). Eliminating the restrictions of fashions by counting on copying and pasting code and information. MCP has a safe protocol by means of which fashions can entry and work together with varied elements of a Jupyter ecosystem. This opens up the idea of built-in, context-aware, and highly effective AI-driven help.
Options of Jupyter MCP Server
By means of the Mannequin Context Protocol (MCP), the Jupyter MCP Server gives a structured means for exterior purposes to work together with core Jupyter elements.
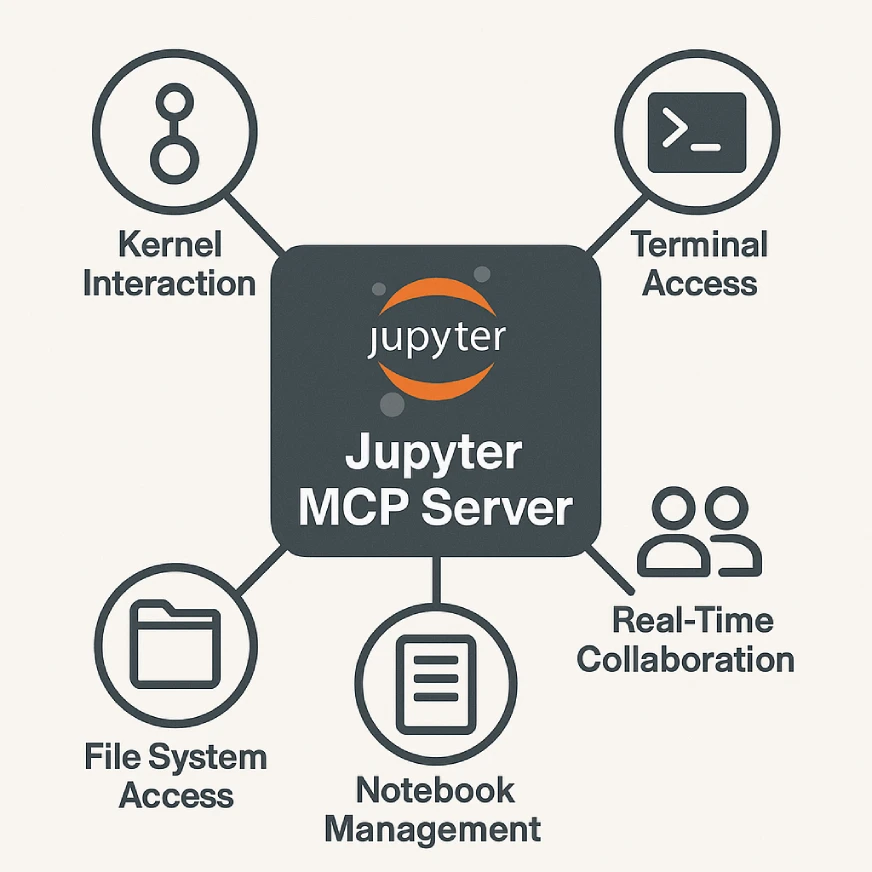
- Kernel Interplay: Helps execution of code inside energetic Jupyter kernels, retrieval of variable states, and administration of kernel lifecycle.
- File System Entry: Offers managed entry to the consumer’s workspace, permitting studying, writing, and administration of information and directories by means of Jupyter’s Content material Supervisor.
- Terminal Entry: Permits interplay with Jupyter’s terminal periods, permitting execution of shell instructions, bundle installations, and automation of system duties
- Actual-Time- Collaboration: Permits a number of customers or AI brokers to view and edit notebooks concurrently.
- Pocket book Administration: Environment friendly pocket book administration contains saving and retrieving pocket book info, guaranteeing information integrity and accessibility.
Let’s now perceive a few of these options intimately.
Key Functionalities of Jupyter MCP Server
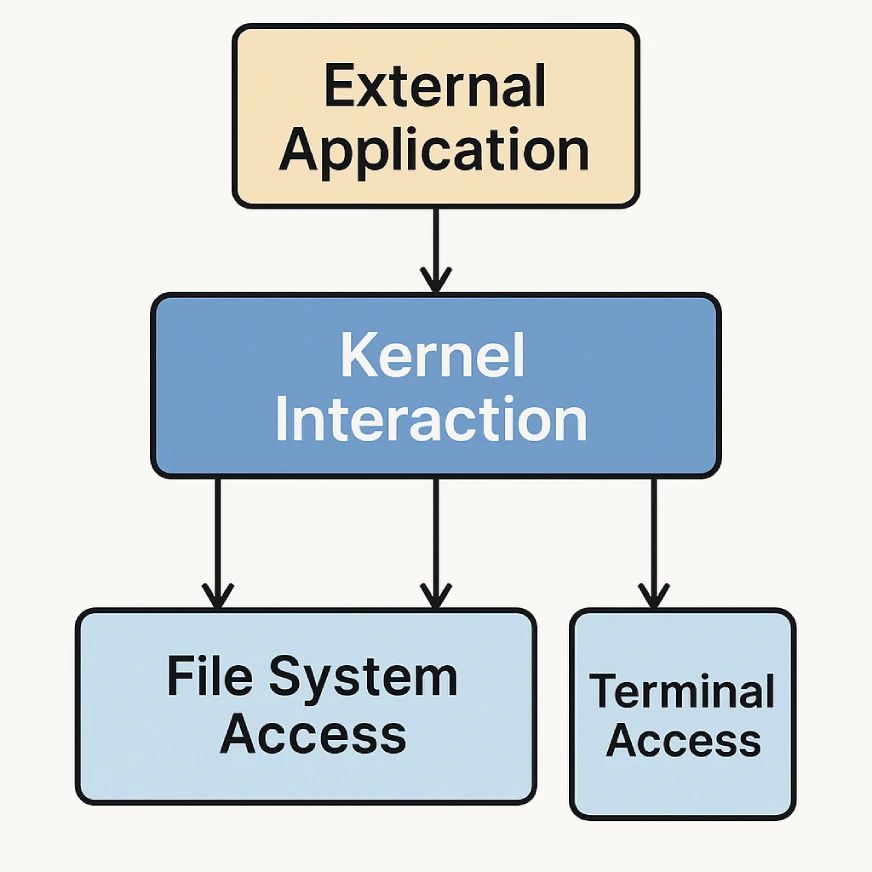
The system consists of three principal elements: kernel Interplay, File System Entry, and Terminal Entry.
This allows exterior purposes to interface with Jupyter environments by operating code, managing information, and controlling terminal periods, respectively. Within the coming sections, we’ll perceive every one among them intimately:
Kernel Interplay
It lets Jupyter MCP Server run code contained in the consumer’s energetic kernels. It additionally inspects kernel state, retrieves execution outcomes, and even manages kernel lifecycle.
The way it works: The MCP Consumer sends requests to the MCP API, specifying the goal kernel and the motion. Then, the MCP server communicates with Jupyter’s kernel Supervisor to course of the request.
Attainable Actions:
- Operating code cells
- Retrieving variable values
- Checking kernel standing
- Interrupting or restarting kernels
File System Entry
It gives managed entry to the consumer’s workspace, permitting exterior purposes to learn, write, or handle information and directories.
The way it works: The MCP shopper requests file operations below the foundations set by Jupyter’s Content material Supervisor and MCP’s safety insurance policies.
Attainable Actions:
- Studying file contents
- Writing or modifying information
- Creating or deleting information and folders
Terminal Entry
It permits Jupyter MCP Server to work together with Jupyter’s terminal periods.
The way it works: The MCP shopper sends instructions to a particular terminal session, and Jupyter’s Terminal Supervisor processes the request, returning any output.
Attainable Actions:
- Operating shell instructions
- Putting in packages
- Managing background processes
- Automating system duties
Find out how to Combine Jupyter MCP Server?
This part outlines the steps required for the combination of the Jupyter MCP Server. However earlier than diving into the set up and configuration course of, let’s first evaluation the conditions wanted to arrange the Jupyter MCP Server correctly. For an in depth walkthrough, discuss with this Jupyter MCP Server tutorial to make sure you’re totally ready earlier than beginning the setup.
As soon as the conditions are met, we’ll proceed with the set up and setup steps.
Stipulations
Earlier than putting in Jupyter MCP Server, guarantee the next necessities are in place :
- Python 3.8 or above: The server is constructed on trendy Python options and requires an up-to-date surroundings
- Jupyter Server: MCP Server operates as an extension of the Jupyter Server. If not already put in, you’ll be able to add it utilizing the next command.
pip set up jupyter-serverSet up
Because you’re completed with the conditions, let’s carry out the steps to obtain Jupyter MCP Server.
1. Obtain
There are two methods in which you’ll obtain the Jupyter MCP server
Normal Set up
Putting in Jupyter MCP Server instantly from PyPI utilizing pip:
pip set up jupyter-mcp-serverImprovement Set up
You too can clone the supply code repository from right here
Step 1: Clone the above-mentioned repository
git clone https://github.com/datalayer/jupyter-mcp-server.git
cd jupyter-mcp-server
Step 2: Obtain Editable Mode: This lets you make modifications within the supply code that can be mirrored.
Use the -e flag with pip to put in the bundle in editable mode.
Pip set up -eIf you happen to plan to run exams and contribute, you need to use the next code:
Pip set up -e “.[dev]” 2. Activate Extension
As soon as put in (both the best way defined above), you want to allow the extension for the Jupyter server. This hundreds and makes use of the MCP server performance. Modifying Jupyter configurations, and updating the record of energetic extensions with the MCP server.
jupyter server extension allow jupyter_mcp_server As soon as completed with the above steps, you’ll be able to confirm your set up with the Jupyter server extension record.
jupyter server extension recordProfessional tip: If you happen to see jupyter_mcp_server within the record, then it’s activated.
Jupyter MCP Server Working
The Jupyter MCP Server gained’t be a visual interface as an alternative, it’s inside JupyterLAB or Pocket book. It presents an HTTP API that different instruments, comparable to Claude Desktop, AI fashions, backends, or plugins.
When utilizing Claude Desktop, make modifications within the claude_desktop_config.json. The TOKEN worth and NOTEBOOK_PATH could be obtained from the terminal when you run your Jupyter pocket book
Code for Home windows:
{

  "mcpServers": {

    "jupyter": {

      "command": "docker",

      "args": [

        "run",

        "-i",

        "--rm",

        "-e",

        "SERVER_URL",

        "-e",

        "TOKEN",

        "-e",

        "NOTEBOOK_PATH",

        "datalayer/jupyter-mcp-server:latest"

      ],

      "env": {

        "SERVER_URL": "http://host.docker.inner:8888",

        "TOKEN": "MY_TOKEN",

        "NOTEBOOK_PATH": "pocket book.ipynb"

      }

    }

  }

}
Code for Linux:
CLAUDE_CONFIG=${HOME}/.config/Claude/claude_desktop_config.json

cat <<EOF > $CLAUDE_CONFIG

{

  "mcpServers": {

    "jupyter": {

      "command": "docker",

      "args": [

        "run",

        "-i",

        "--rm",

        "-e",

        "SERVER_URL",

        "-e",

        "TOKEN",

        "-e",

        "NOTEBOOK_PATH",

        "--network=host",

        "datalayer/jupyter-mcp-server:latest"

      ],

      "env": {

        "SERVER_URL": "http://localhost:8888",

        "TOKEN": "MY_TOKEN",

        "NOTEBOOK_PATH": "pocket book.ipynb"

      }

    }

  }

}

EOF

cat $CLAUDE_CONFIG
As soon as authorized, if it needs to work together together with your Jupyter session, it sends a request to this API. The MCP Server handles the request by checking if it’s allowed, speaking with the suitable a part of Jupyter, such because the kernel, file system, or terminal, and sending again the mandatory response.
The API endpoint offered by the MCP extension, which lives at /mcp/v1, is simply an added path to your Jupyter Server’s base URL.
So, in case your Jupyter server is operating domestically at http://localhost:8888/, yow will discover the MCP API at http://localhost:8888/mcp/v1. That is the place exterior instruments just like the Jupyter MCP server will attain out to speak together with your Jupyter surroundings.
HTTP requests are despatched by the Jupyter MCP Server, like GET, POST, PUT, or DELETE, relying on the duty. Every request goes to a particular subpath below /mcp/v1. These request patterns and information buildings make up what’s often known as the Mannequin Context Protocol (MCP). For extra particulars, you’ll be able to discuss with the primary README file within the venture explaining the function of the endpoint.
Arms-on Software
Within the hands-on, we’ll see learn how to:
- Add code cells: These are sections the place you’ll be able to write and run the code.
- Run your code: Simply hit a button to see the outcomes immediately
- Add textual content with markdown: Use markdown cells to jot down notes, explanations, or headings to make your work look organized.
Supply: LinkedIn
It’s like having a pocket book excellent for studying and experimenting.
Context Administration and Safety of Jupyter MCP
MCP isn’t about enabling entry, it ensures managed and safe entry. The protocol enforces authorization and scoping, i.e., limiting entry to what’s explicitly allowed. Customers have visibility and management over what purposes can entry their session and what they do.This prevents unauthorized entry, protects consumer information, and retains the Jupyter surroundings safe.
Conclusion
Hope you Jupyter MCP Server tutorial useful! The Jupyter MCP Server brings smarter, AI-powered interactions to your Jupyter surroundings.It makes use of the Mannequin Context Protocol (MCP) to do that safely and in a standardized means. The server is already out there and simple to arrange. I imagine that as adoption grows, we are able to anticipate extra clever, context-aware instruments that don’t simply help however actually perceive our workflow. Therefore, bridging the hole between highly effective AI fashions and dynamic environments.
Information Scientist | AWS Licensed Options Architect | AI & ML Innovator
As a Information Scientist at Analytics Vidhya, I focus on Machine Studying, Deep Studying, and AI-driven options, leveraging NLP, pc imaginative and prescient, and cloud applied sciences to construct scalable purposes.
With a B.Tech in Laptop Science (Information Science) from VIT and certifications like AWS Licensed Options Architect and TensorFlow, my work spans Generative AI, Anomaly Detection, Faux Information Detection, and Emotion Recognition. Enthusiastic about innovation, I attempt to develop clever methods that form the way forward for AI.
Login to proceed studying and revel in expert-curated content material.